

Real estate agent direct mail is an effective tool for any realtor. Not only does direct mail allow you to reach potential buyers and sellers, but it also ensures you are coming into direct contact with your most ideal audience. This makes direct mail one of the most effective and efficient forms of advertising for real estate agents.
That being said, working with marketing campaign managers, graphic designers and printers to organize a mail-out can be very time-consuming. To help solve this problem, One To One Mailing has developed a way for real estate agents to order direct mail online.
This all-in-one real estate agent direct mail campaign builder means no back-and-forth, no waiting, no designers (unless you want one). Just quick, easy and headache-free campaigns at the click of a button.
Ready to give direct mail for real estate a try?
Here’s how to use our personalized mail campaign builder.
Real Estate Agent Direct Mail Campaign Builder
To get started, head over to our Real Estate Direct Mail Ordering tool.
Keep in mind – Our team is available via live chat to help you every step of the way. Simply click “Chat With Our Team” in the bottom right-hand corner, at any time throughout the process, to start a conversation.
Step 1: Choose Your Direct Mail Campaign Type
First, we’ll determine what type of real estate agent direct mail campaign you wish to run.
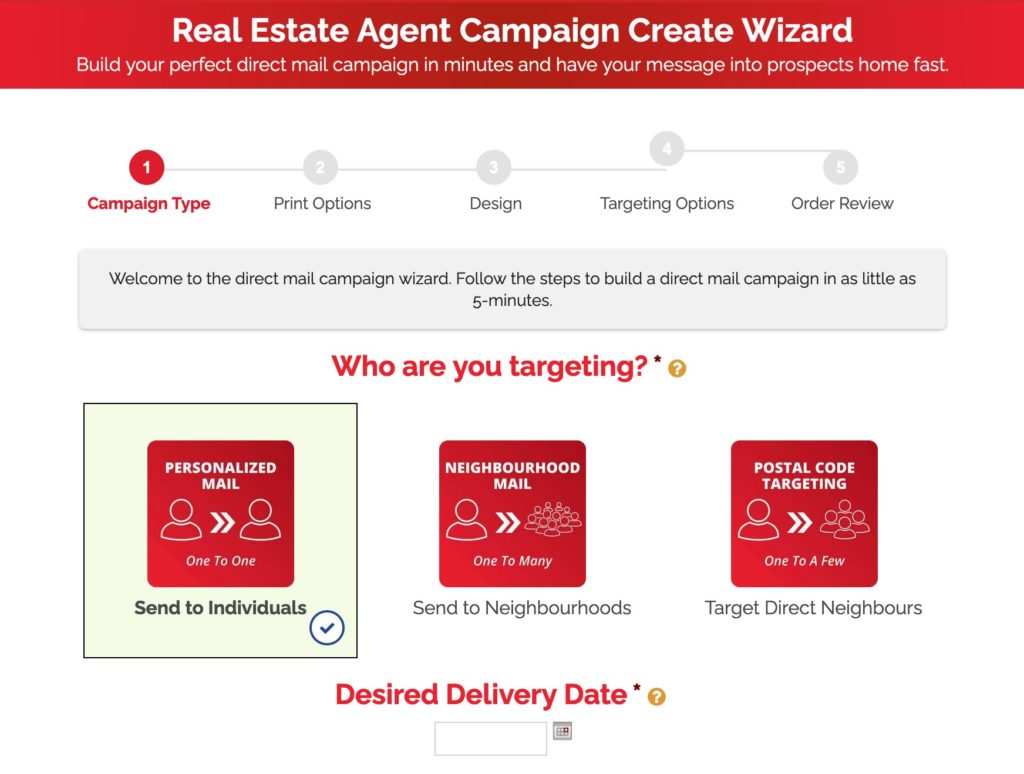
You’ll notice that there are a few options to choose from. To start, select either:
- Personalized mail – this will allow you to send your personalized mail out to specific people using their name and address. If you have a list of clients you want to reach out to this option will allow you to do that. If you don’t have a list of names and addresses you can also purchase one of our data lists.
- Neighbourhood mail – this type of mail-out will target all of the addresses in a certain neighbourhood. To deliver your direct mail, a Canada Post postman will target all of the homes on his or her route.
- Postal code targeting – this option will allow you to target homes based on a specific postal code. Typically, this type of targeting will consist of approximately 16 to 20 addresses.
After you select one of these three options, choose your desired delivery date. To choose your date, click in the “Desired Delivery Date” field and select a date from the calendar that pops up.
Please Note: Canada Post will deliver your direct mail campaign. Your desired delivery date may be impacted based on your location.
Click the “Next” button to move on to the next step.
Alternatively, you can click “Save & Complete Later” at the bottom of your screen. This will save your setup progress so that you can come back to your campaign at a later time. This option is available throughout your campaign design process.
Step 2: Specify Your Print Options
Next, our real estate agent direct mail campaign builder will ask you to specify your print options, including the number of households you want to reach.
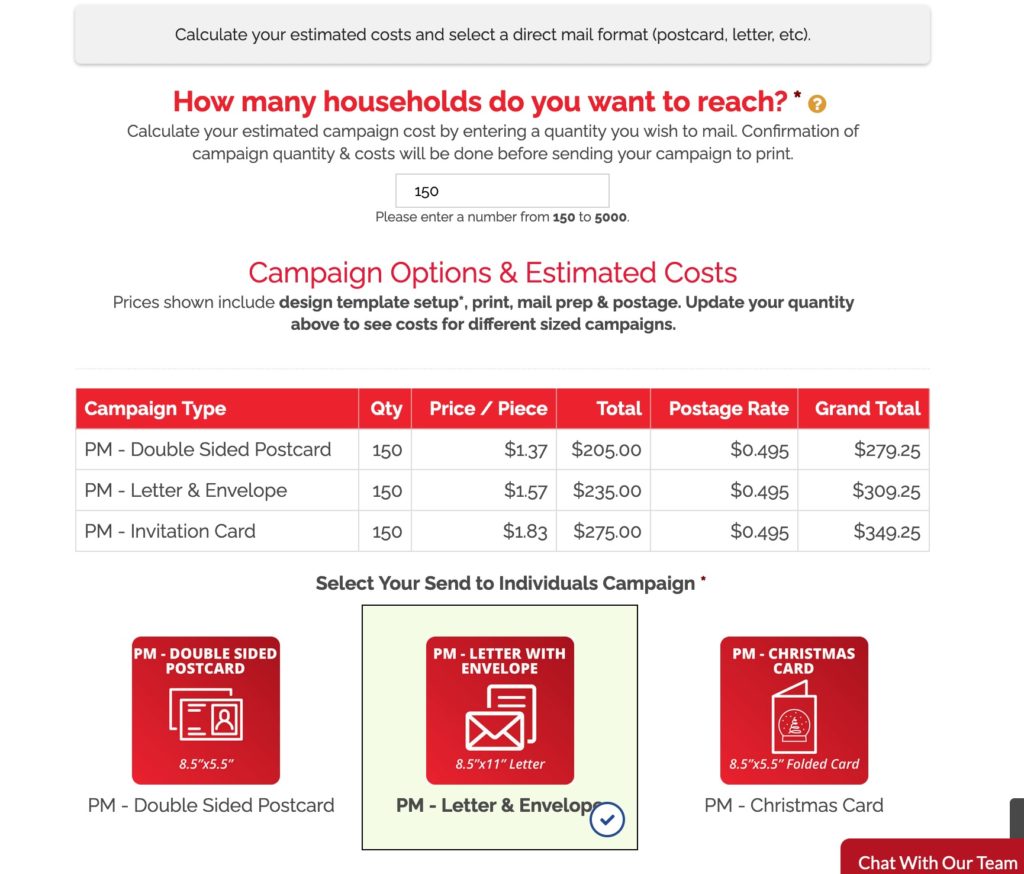
Enter the number of homes you would like to target in the “How many households do you want to reach?” field.
Please Note: A minimum quantity of 150 is required.
Based on the size of your campaign, a list of campaign options and prices will be presented. These prices include everything from design template setup to printing and postage.
To compare the cost of various sized campaigns, simply enter different quantities into the “How many households do you want to reach?” field.
Once you’ve decided on a campaign size, select the type of direct mail you would like to send. Direct mail types include:
- Postcard
- Letter
- Christmas card, etc.
If needed, design templates for each option will be provided during the next step.
Click “Next” to continue.
Step 3: Design Your Real Estate Agent Direct Mail
Now, choose the design option that works best for you.
One To One Mailing’s online direct mail tool allows you to choose from the following design options:
Pre-Designed Templates
If you select the “Choose From Our Templates” option, you’ll be provided with several great real estate direct mail templates.
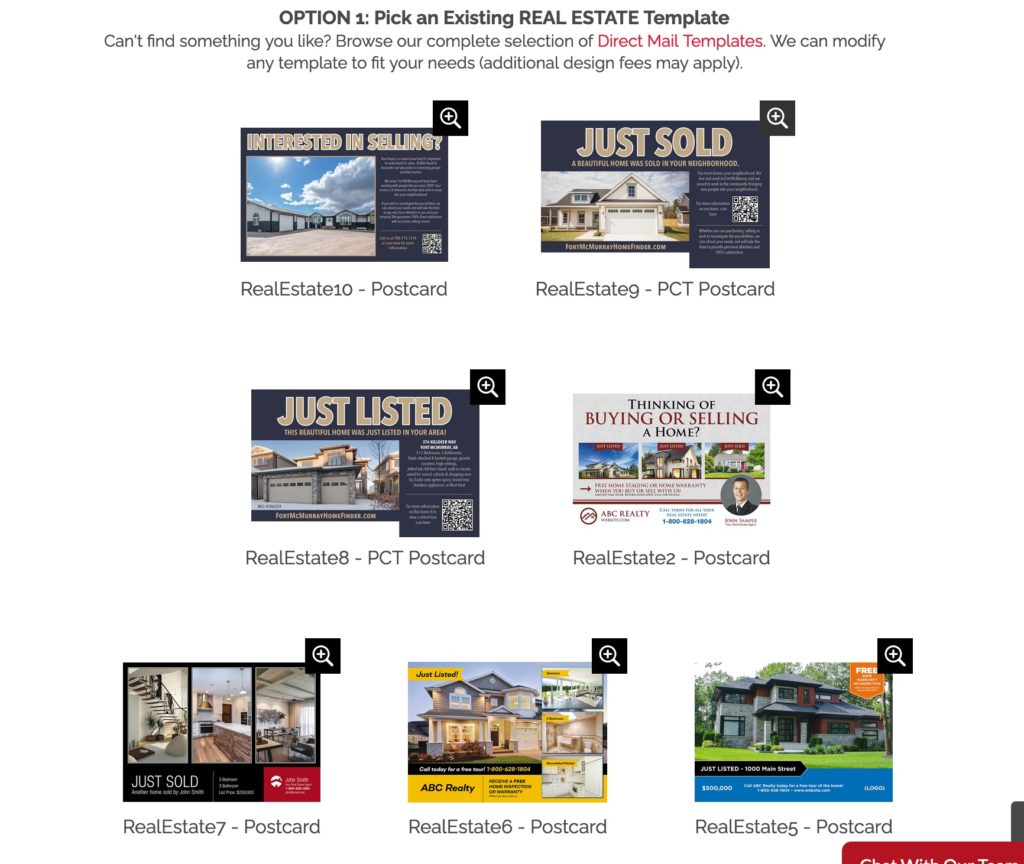
Choose a template from our template library, then select “Next”. Alternatively, you can choose to select a template later by checking the “I will pick a template after order completion” box under Option 2 at the bottom of the screen.
If you choose to select a template later, our team with contact you after you place your direct mail order to help you choose the best template for your needs.
Full Custom Design
If you opt for a full custom design, you’ll be asked to provide as much information as possible about the design you’re looking for.
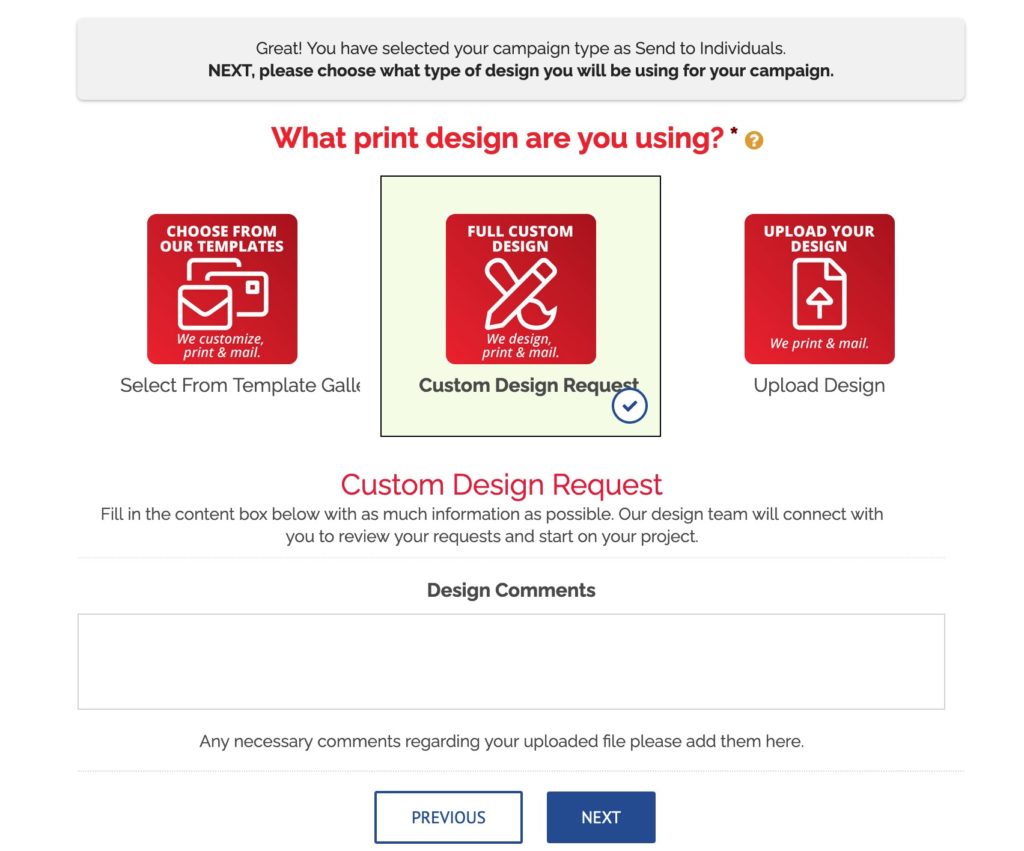
After receiving your order, our design team will connect with you to review your requests and start on your project.
Once you’ve provided all the necessary details, click “Next”.
Upload a Design
Would you rather upload your own design for your real estate agent direct mail?
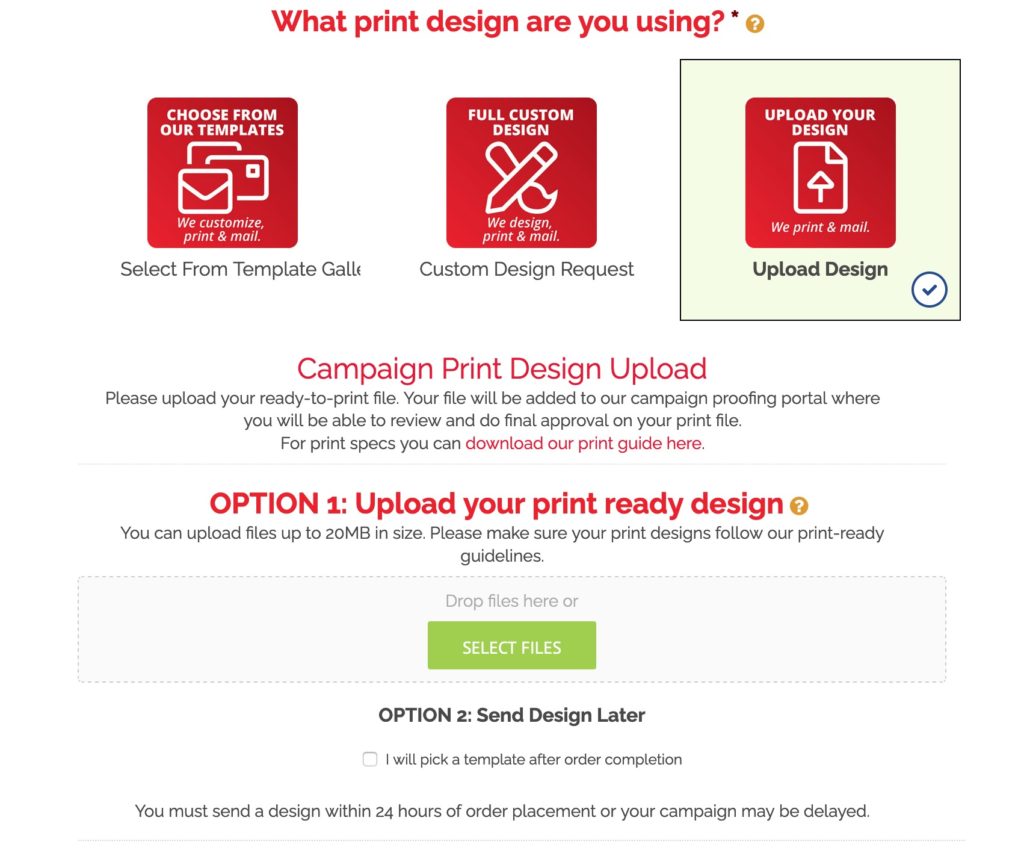
To do so, simply follow One To One Mailing’s print guidelines and upload your file. To view these guidelines, click the “download our print guide here” link on the Upload Design page.
Once your file is ready to go, upload it by dragging it into the specified upload area or by clicking “Select Files”. Then, choose the file you’d like to upload and click “Open” in the bottom right corner of the pop-up window.
Once uploaded, your file will be added to our proofing portal. There, you will be able to review it before providing final approval.
Please Note: Files must be 20MB or less.
Alternatively, you can choose to send in your design later. For this option, click in the check box under Option 2. Keep in mind, you must send a design within 24 hours of placing your order to avoid delays.
Once you’ve successfully uploaded your design or opted to upload it later, click “Next”.
Step 4: Targeting Options
Finally, you’ll be asked who you want to target with your real estate agent direct mail campaign.
One to One Mailing’s direct mail campaign builder will allow you to upload your own list of names and addresses or to target homes based on other parameters.
Using Your Own Customer Database
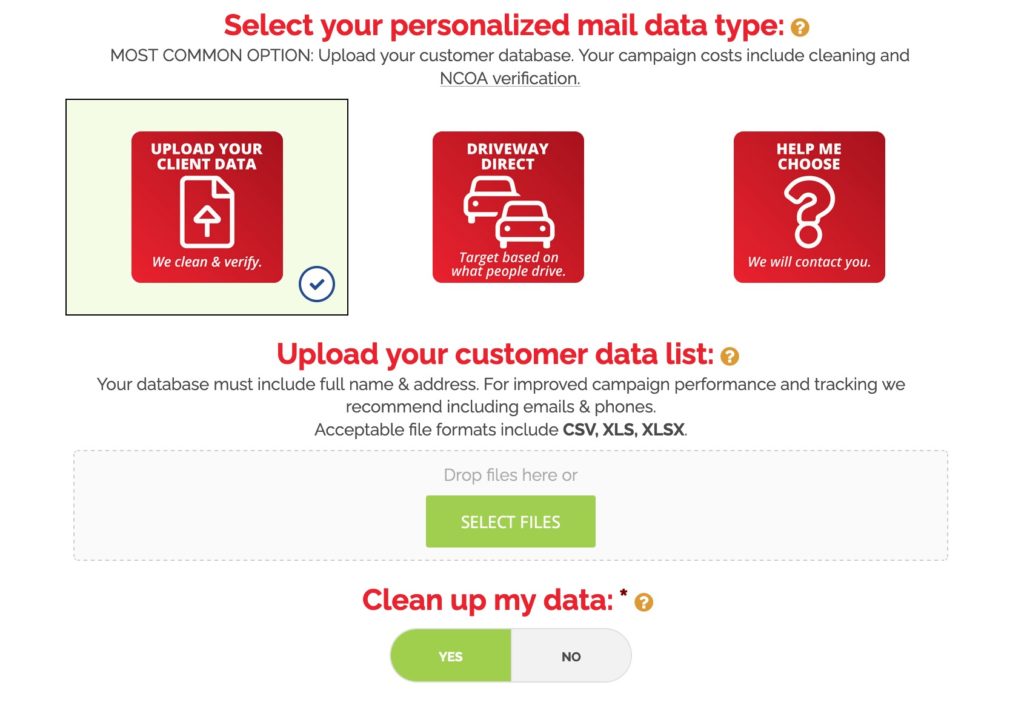
To upload your own database, click “Select Files”. Select the file you want to upload and then click “Open” in the file window.
Please Note: If you would like to use your own database, be sure that it includes full names and addresses. Email addresses and phone numbers can also be included for additional campaign performance metrics. The following file formats can be accepted – CSV, XLS, XLSX.
Once the file has been uploaded, click “Yes” or “No” under the “Clean up my data” heading. This will let us know if you want the team at One To One Mailing to clean up your data file. For your first order, we’ll clean your data for free and provide you with a formatted client file for future use. In the future, you can use this as a template to avoid data cleaning fees. When you use your own file, we’ll also verify the addresses you provide to ensure that your direct mail is being sent to the correct location.
Click “Next – Campaign Review” at the bottom of the page to move on to the final review step.
Driveway Direct
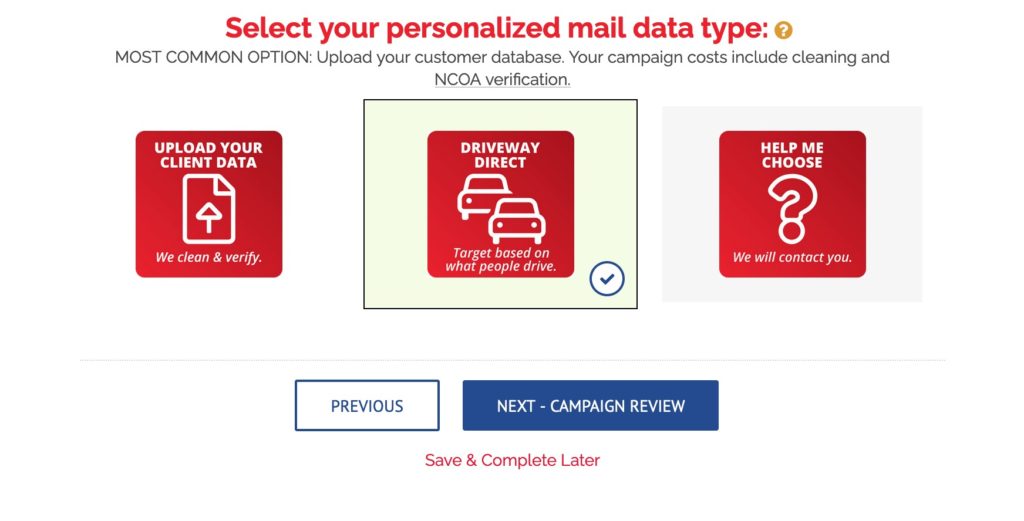
The Driveway Direct option allows you to target homes based on the type(s) of vehicles the homeowners drive.
To use this option, simply select “Driveway Direct” then click “Next – Campaign Review” to move on to the final review stage.
Help Me Choose
If you’re unsure about the best way to reach your target audience, select the “Help Me Choose” option. In this case, we’ll contact you to help you decide on the best way to reach your audience.
Click “Next – Campaign Review”.
Please Note: Data sets for targeting individual households are also available at an additional cost.
Step 5: Review Your Order
Finally, you’ll have the chance to review your order, as well as your contact and billing information, selected campaign options and your total campaign cost.
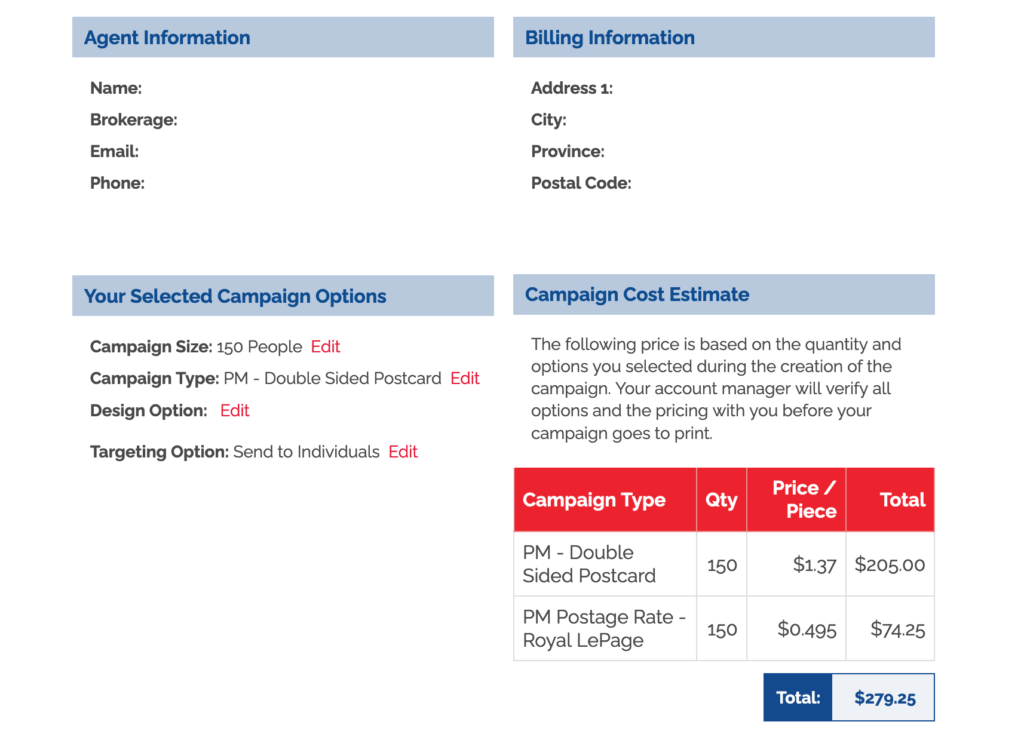
Review all of your details and campaign options, then provide a name for your campaign in the text box provided.
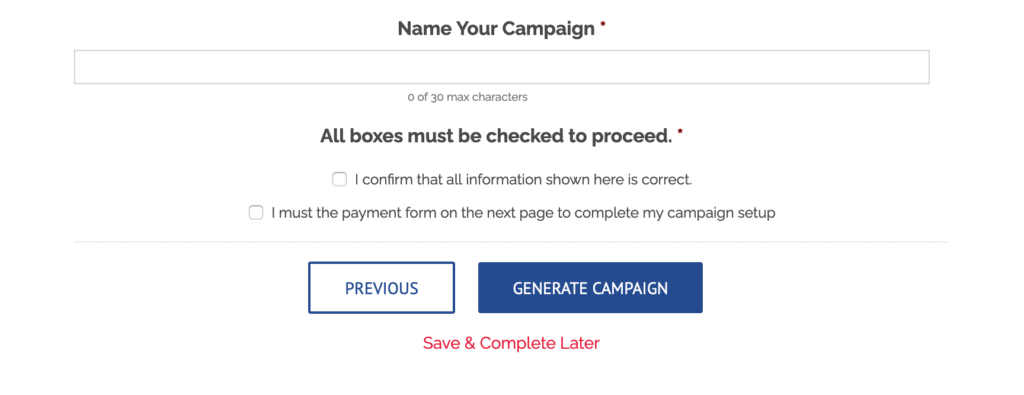
Be sure to read the notes at the bottom of the page, then verify that you have reviewed your order by checking all checkboxes.
Click “Generate Campaign” to place your order. Once you do so, you will be taken to a payment page to complete your transaction.
After you’ve completed all of the steps above and provided your payment details, your real estate agent direct mail campaign will be sent to our team for processing. Your One To One Mailing account manager will contact you to discuss any outstanding issues. They will also help you with additional selections that need to be made, verify pricing details and answer any questions you may have before your campaign goes to print.
Once everything is verified, our team will print your campaign and provide it to Canada Post to be sent out to your audience.
As a Canada Post Partner, One To One Mailing will ensure that your campaign is delivered to prospective clients quickly and efficiently.
Have more questions about building a real estate agent direct mail campaign using our online tool? Get in touch with our team and we’d be happy to help!